ArtisanRV for Revit allows you to place single-planting specimens such as trees, plants, and shrubs – and it’s worth remembering that they can be placed on any topography, floor, or filled region.
In this latest blog, crafted by CloudScapes Evangelist Ricardo Torres Corza, we explore how you can best utilise the tools at your disposal within ArtisanRV when placing single-planting specimens.
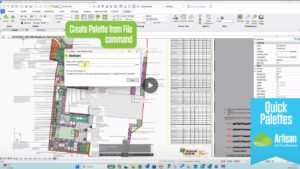
Get to know the Create Detail tool
With the create detail tool, you can select from ArtisanRV’s Default Palettes or from your own Palettes. Once you click on the Create Detail tool, a pop-up appears showing the available Palettes. Depending on the Palette you select, the available planting specimens will then be displayed.
To start placing single-planting specimens with ArtisanRV for Revit, you need to select an item and click on the “Spot” icon.
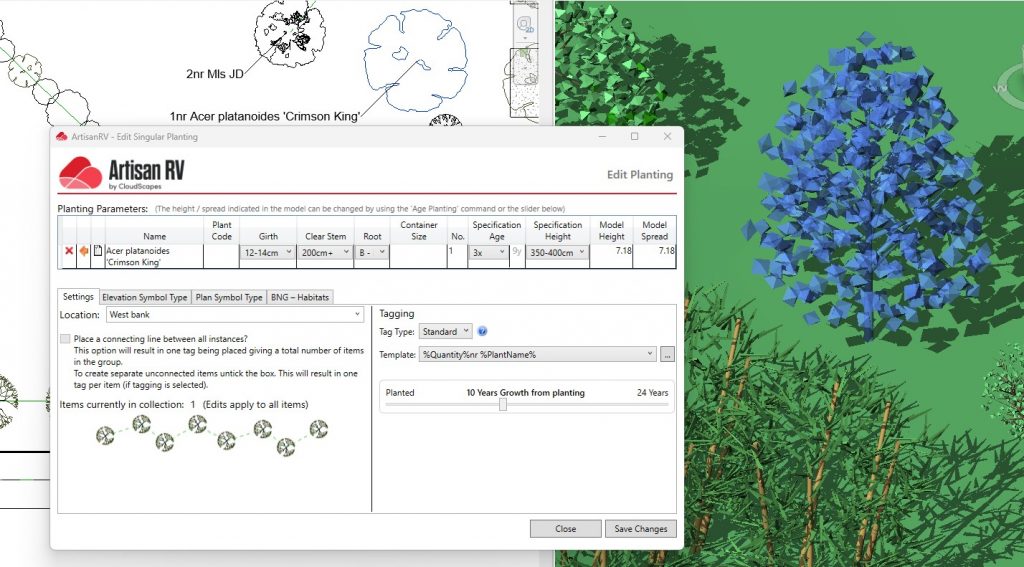
From here, you can use the default setting and start single-planting specimens right away or, customize them before placing them. I will skip customization for now and instead show you how to place the single-planting specimens.
How to place single-planting specimens
In order to follow good design practices, I recommend that you first lay out the path that the single-planting specimens will follow in your landscape design. You could follow a free-style design process should you wish but in order to achieve a more organized design aesthetic, you should use detail or model lines to set a reference point. Note that you can place single specimens randomly without having to follow a linear path. There is also a Linear Planting tool to enable users to place planting along a linear path at defined centres, either as a hedge or an avenue.
You can now select the location you want your single-planting specimens to be placed and continue until you’re satisfied with the result. To finish placing the single-planting specimens, just hit the Escape button on your keyboard.
The result will be a series of single-planting specimens connected by a green dashed detail line (if the ‘connecting line’ option has been selected). This line is the connector that indicates the relationship between all single-planting specimens. It’s also worth noting that there will be a tag including the count and name of the single-planting specimens placed. You can hide/unhide the tag using Revit native graphics override settings.
Change your view
Besides the connector and the tag, there’s also a default display of the ultimate spread and ultimate root ball. You can adjust their visibility using the graphics override tool.
If you have a 3D view with a scope/section box close to the ultimate spread of the placed single-planting specimens, then you will notice that they won’t appear. This is because the ArtisanRV for Revit default trees are configured to hide when the section box touches any angle of the ultimate spread.
To overcome this obstacle, simply stretch the scope/section box so it surpasses the ultimate spread of the single-planting specimens placed (applicable to trees only). You can then adjust the size of the scope box to make the trees appear in 3D views but by default, all the single-planting specimens placed are represented as 3D objects. You can play with the ArtisanRV for Revit visibility parameters to define what you want to see in 3D views.
If you would like the option to turn on/off the display modes, then you can do this in the Graphics Visibility dialogue. You will now notice that all of the single-planting specimens are the same height. You can change the value of these at any time by using the Age tool. Simply click on Singular Planting to select all the single-planting specimens you wish to age. The selection will turn blue to indicate you have added the single-planting specimens to the age tool and if you’re happy, click Finish.
Growth visibility for ultimate height and spread
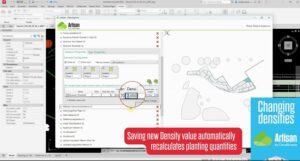
The Age Planting dialogue will prompt you to set up the maximum age you want the single-planting specimens to grow to, although ArtisanRV for Revit will automatically grow the single-planting specimens based on the ultimate height/spread of the plant species. Just click Grow to see the magic happen.
Planting and topographies
Did you notice that all the single-planting specimens (trees) were placed following the underlying topography elevation? That’s one of the most powerful features of ArtisanRV for Revit. You don’t have to worry about the single-planting specimens’ elevation at all.
Another powerful benefit is the ability to modify the topography and reconcile the single-planting specimens already placed within the model. To do this, click Reload within the Planting tab and select Re-Plant Singular Item before selecting the singular item you wish to re-load.
ArtisanRV for Revit will then automatically reload all the instances of the selected single-planting specimen. This way, you can rest assured that the elevation of the single-planting specimens will remain accurate in relation to the underlying topography each and every time.
Change once, update globally: Substituting and updating plants
If you wish to change the single-planting specimen already placed, then you can access the Plant Browser, select the Substitute option and choose from the available palettes. Simply select the Plant Browser command and the Plant Explorer will appear. To replace the single-planting specimen and any other connected specimens, just click on the Substitute Plant for the Selected Host Elements button, before selecting any of the available Palettes and choosing the elements you wish to use when replacing the selected single-planting specimens.
Hopefully this blog has provided you with a comprehensive guide to getting the most out of single-planting specimens within ArtisanRV.
ArtisanRV for Revit goes way beyond placing planting or landscape elements. It has the power to tackle real-world scenarios for designers in order to provide accurate information upon which powerful designs can be informed.
To find out more about how you can get the most out of ArtisanRV, simply get in touch with our team and we can answer any questions you might have.